Search Windows and Linux Networking

Wednesday, February 9, 2011

Taking Backup and Restore your Network Configuration by command line


Taking Backup and Restore  your Network Configuration by command line.

Hi Friends,
     As I promise, I will show you how to configure your (LAN) Network using GUI and from Command line. today , I will show you how to configure your LAN from GUI and from Command line. and I also show you how to take your network configuration backup and restore quickly.

To allow your system (Computer ) to communicate to other network system it required following basic information TCP/IP network
That is:-

Required :
1)IP Address  (Logical Number to system to identify  it should be unique )
2) Subnet mask (To find out the Network information )

Optional :
3) Default Gateway (Exit point or interpriter how know how to reach to other network Basically it is the ip address of your Router (A Device that handle layer 3 information and know how to route the packet ) )
4) DNS Server : IP address of your DNS server that resole your human known host name to the ip address. It is required for naming resolution.
5) WINS Server: same as DNS use in Window network.


Network Configuration Using GUI

    The Most easiest method for configuring your network is GUI.

1) To configure you network interface open  network connection window by Right Clicking on "My Network Places" from your Desktop then select Property

OR
By Start ----Run---(Type ) ncpa.cpl and click ok . It will open Network connection Windows there you find all interface on you system.look like:


2) Now Right Click On You "Local Area Connection" interface or any you want to configure and select property . It look like this:
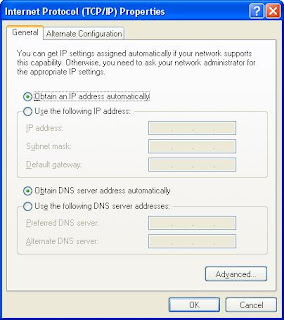
3) In "Local Area Connection " Property windows Select Internet Protocol (TCP/IP) and Click On properties button. It will open new window Internet protocol TCP/IP property windows
4) If you want to allow DHCP server to Configure you network select option obtain IP address automatically and if you want configure you network manually Select use following IP address. and there type the IP Configuration that you given by your Network Administrator or By your ISP (Internet Service Provider )  for example I am configuring my network with following 

5) Click OK to apply it . then Click OK to Close Local Area Connection Property windows .and close your Network connection windows. that's it so ease.

Network Configuration Using Command line:

    This method is little difficult but very interesting for quickly change your network configuration.

Suppose I want to configure same setting using command line the command name is netsh

If I you want to configure your Local Area Connection with DHCP 

1) Open the command prompt by typing CMD in Start- ---Run ---(Type "cmd") and then Click OK.
    It will open Dos command prompt .
2) Now in Command prompt type the following Command to configure your Local Area Connection interface to use DHCP:

netsh interface ip set address "Local Area Connection" dhcp


In Above command "Local Area Connection " is the name of the interface card you want to configure as DHCP

that's it. It will configure your Local Area Connection to obtain IP automatically .

If I you want to configure your Local Area Connection manually with same ip setting I use in GUI Configuration.in Single line:

netsh interface ip set address "Local Area Connection" static 192.168.19.2 255.255.255.0 192.168.19.1 1

In Above command 
 "Local Area Connection " is the name of your interface card that you want to confiure
"192.168.19.2" the IP address you want to assign to interface card
"255.255.255.0" is the Subnet mask for given interface card.
"192.168.19.1" is the Default Gateway for interface card (If you not want to assign Default Gateway simply use 0.0.0.0 )
"1" for matrix.
it will configure your system Local Area Connection with use following IP address option. and add  IP address information like IP address, Subnet mask and Default Gateway.

Now we add DNS infomation to our Local Area Connection interface by using following command

To Configure Primary DNS server use the command
netsh interface ip add dns "Local Area Connection" 202.54.10.4

To Configure Secondary DNS Server Use the following command:

netsh interface ip add dns "Local Area Connection" 202.205.5.5 index=2

It will Add your DNS server inforamtion on your Local Area Connection Interface.

Backup your Network Configuration:

To Backup your All Network Interface Configuration to the txt file as office_LAN.txt on C drive Use the following commad:

netsh -c interface dump > c:/office_LAN.txt

It will take your network connection backup to c drive as office_LAN.txt

Restore Your Network Configuration from your backup you have taken:
netsh -f c:/office_LAN.txt

It will restore your network connection Configuration as same as the time you have taken backup.

Monday, February 7, 2011

My up coming post

Hello Friends,

     As my Some Friend ask me to post for Following server I will promises to you all. I will post all the server on both Windows and Linux as well as Router and Switches.

Firest I will start with Windows later Linux and then Networking, I will also show you how to secure your network and server from many kind of attack like spoofing , Data injection and password attack. We will start
By
1) Configuring Network for LAN using  GUI and also from Command line  (This is the basic requirement to setup Network to communicate with other Networking devices like Server, Client, Routers etc.)
2) DNS (Domain Naming Server OR Domain Naming System) It is very important server on both Internet and In windows Active Directory Domain. For naming resolution and to find the server or services on the network. If thins server down we are not able to browse on internet because for that we had to know all server IP address to open particular site and also Active Directory is depend on DNS so if This server down your Active Directory will not run properly.
3) DHCP (Dynamic Host Configuration Protocol ) Server . It is also important on big network to configure network settting and manage your network address. and provide quick update setting on all client from centrally.
4) DFS (Distributed File System OR Distributed File Server ). In Window network DFS provide A Conman Environment to the Users Single point to allow access the shared File or Folder on physically different servers.  And also Provide Redundancy and Migration for File Server .
5) Active Directory : It provide Centralize Administration, Authorization and Assignment of Right and Permissions.
6) IIS (Internet Information Service or Internet Information Server) It provide all services that are commanly required for internet like FTP, WEB Server, SMTP , etc.
7) Routing and Remote Access Server: for NATing , VPN and Radius
    a) VPN (Virtual Privat Network )It allow user to access his office network from remotely by virtual and secure connection to his Office network.
   b) NAT: It hide our network from external network and provide better security.
   c) Radius: It provide getter Security by checking additional information (it do the same job like security grad do in our office . like it check our I'card, it confirm his database or asking us if he should allowed to him in or not or where should he contact in Allowed  )
8) Mail Server: provide service for E-Mail.
9)Windows 2008 Core Server :
   a) Configuring DNS server on Core Server
   b) Configuring DHCP Server on Core Server
   c) Configuring IIS On Core Server
   d) Installing and Configuring Active Directory on Core Server
   e) installing and configuring Hyper-V (virtualization )on Core Server
10) virtualization
11) streaming Media Server : provide streaming service to broadcast video
12) Exchange server
13) ISA Server
14) Share Point Server
15) Remote Installation Server and Windows Deployment Server to Install OS remotely
16) Teminal Server and Thin Client.
   a) RemoteApp
   b) Terminal Server Gateway.
17) Network Load Balancing cluster.
18) Window Server Cluster For High Avilabilty for database and Services.
19) Windows High Performance server Cluster (Super Computing on Windows)
20) Configuring Network on Linux System
21) DNS Server on Linux.
22) DHCP Server on Linux
23) Samba File Server On Linux
24) Appach Server on Linux
25) FTP Server on Linux
26) IPtable (Firewall on Linux)
27) Squid Proxy server
28) Configuring Your Linux as Router.
29) Configuring your Cisco Switches and Router for Routing , VLAN and Access control list
30) Taking Role Base Backup 
   and many more

Tuesday, February 1, 2011

Creating FTP site with Isolate user using Active Directory

Creating FTP site with Isolate user using Active Directory

         As previously we had seen how to create FTP site with and without Isolate user to day we will see how to create FTP site with Isolate User using Active Directory. as the name sagest you have gets what is the requirement for FTP with Isolate users using Active Directory . Correct Active Directory envelopment must be in the please to implement this type of FTP site scenario. With out active Directory you will not able to do this type of FTP server.  

      You can be implement this type of server if you want user and do there job by access there home directory for download or upload there data from remotely using internet (Actually for work from remotely this is not the correct method VPN is the best option for work remotely, Other option are sharepoint server, or use secure FTP server  but I am give only the example for how you can implement this type of FTP server ) 

      So, What are the Basic requirement for FTP site with Isolate user using Active Directory.


1) fist and the most important we required Active Directory in please to implement this kind of setup.

2) second requirement is users must have define home directory for each user.

3) we required on user account for allowing ftp to read Active directory database for finding home directory for the user.

4) your Active Directory Domain Name. 

Lets Start Creating FTP site With Isolate users with active Directory.

1. Install the FTP Service from add/remove windows components.

2. Open IISManager

3. Delete the Default FTP Site as it does not get created in isolation mode by default

4. Create a New FTP Site by right clicking FTP Sites and going to new FTP Site

clip_image001[1]

5. This will launch the FTP Site Creation Wizard, Click Next

6. Enter a Description for Your FTP Site

clip_image002[1]

7. Set the IP address and Port to use for your FTP Site

clip_image003[1]

8. Next screen will be the FTP User Isolation options, Select Isolate users using Active Directory

clip_image004[1]

9. Next you will need to select a User that has Access to Active Directory, any domain admin account will suffice. Click Next and re-enter password to Confirm

clip_image005[1]

10. Select the required Permissions and click Next and then Click Finish

clip_image006

11. The IIS portion is now finished and now on to AD.

12. There are 2 schema attributes in AD that reside in the User Class that will allow us to define the users home directory for FTP. They are msIIS-FTPRoot which defines the root of the FTP server and msIIS-FTPDir which defines the users Home Directory. The problem here is that there is no GUI interface to define these attributes so for the purpose of this demonstration I will use ADSIEDIT from Support tools to modify these attributes, however you can also run the below script to do it as well.

Iisftp.vbs /SetADProp UserName FTPRoot Server\Share

Iisftp.vbs /SetADProp UserName FTPDir Directory

13. Load Up Adsiedit and drill down to the user account you want to isolate and go to the properties of that account and modify the 2 attributes mentioned above

clip_image007

14. Now whenever that user connects to your FTP server the user will be isolated to the Home Directory that was defined in Active Directory.