Search Windows and Linux Networking

Showing posts with label DHCP. Show all posts

Wednesday, January 18, 2012

Install & Configure DHCP Server role on Windows 2008 Server Core

DHCP Server is very important server in the network environment. We can install & configure DHCP server role using below steps in windows 2008 server core...


1) First we will have to run below command on windows 2008 server core to add the DHCP server role.


2) Then to start DHCP service automatically, use below command...


3) Then use below command to start the DHCP service


4) If the DHCP server is in Active Directory domain environment (i.e. Member of a domain) then we must have to authorize the DHCP server to work properly.

To authorize the server in domain , use below command..


5) Now to add scope to the DHCP Server use below command


(C:\windows\system32>netsh dhcp server 192.168.127.11 add scope 192.168.127.0 255.255.255.0 scope1)

In the above command 192.168.127.11 = the IP of DHCP server

192.168.127.0 255.255.255.0 = subnet & subnet mask of scope which we have to add

Scope1 = name of the scope to be added

6) Then we will need to set the IP range for the added scope, for this use below command..


(C:\windows\system32>netsh dhcp server 192.168.127.11 scope 192.168.127.0 add iprange 192.168.127.50 192.168.127.100)

Using above command we have added IP range (192.168.127.50 - 192.168.127.100) to the scope (192.168.127.0) in the DHCP server (192.168.127.11)

7) If we want to add exclusion range to DHCP range then we have to use below command


(C:\windows\system32>netsh dhcp server 192.168.127.11 scope 192.168.127.0 add excluderange 192.168.127.56 192.168.127.60)

Using above command we have added exclusion IP range (192.168.127.56 - 192.168.127.60) to the scope (192.168.127.0) in the DHCP server (192.168.127.11)

8) To set Default Gateway (Option 003) use below command..


(C:\windows\system32>netsh dhcp server 192.168.127.11 scope 192.168.127.0 set optionvalue 003 IPADDRESS 192.168.127.1)

Using above command we have set Default Gateway address as 192.168.127.1 for the scope 192.168.127.0

9) To set DNS server (Option 006) use below command..


(C:\windows\system32>netsh dhcp server 192.168.127.11 scope 192.168.127.0 set optionvalue 006 IPADDRESS 192.168.127.10)

Using above command we have set primary DNS address as 192.168.127.10 for the scope 192.168.127.0

10) Then finally we will have to activate this scope, for this , use below command


(C:\windows\system32>netsh dhcp server 192.168.127.11 scope 192.168.127.0 set state 1)

Now your DHCP server should be running & working fine!

I hope this will help you to setup DHCP server on windows 2008 server core with ease.

Tuesday, October 25, 2011

Configure Cisco Router with OSPF and DHCP Relay Agent

Configure Network with using  Cisco Router and DHCP server

Today we will see how to configure cisco router with ospf and act as relay agent.


For example we have a DHCP Server that is configure to provide IP address two different network  192.168.0.0/24 and 192.168.2.0/24.  DHCP is providing correct ip in same network(head office) but in other network client are not getting ip address from DHCP server.
Problem is occurring  because by default router break broadcast domain .to fix the problem we have told router to allow DHCP DORA process


Head office Router

Router>
Router>enable
Router#configure terminal
Enter configuration commands, one per line.  End with CNTL/Z.
HeadOffice(config)#hostname HeadOffice
HeadOffice(config)#interface FastEthernet 0/0
HeadOffice(config-if)#ip address 192.168.0.1 255.255.255.0
HeadOffice(config-if)#no shutdown

%LINK-5-CHANGED: Interface FastEthernet0/0, changed state to up

%LINEPROTO-5-UPDOWN: Line protocol on Interface FastEthernet0/0, changed state to up

HeadOffice(config-if)#exit
HeadOffice(config)#interface FastEthernet 1/0
HeadOffice(config-if)#ip address 192.168.1.1 255.255.255.0
HeadOffice(config-if)#no shutdown

%LINK-5-CHANGED: Interface FastEthernet1/0, changed state to up

HeadOffice(config-if)#exit
HeadOffice(config)#

Configure routing with ospf:-

HeadOffice(config)#router ospf 1
HeadOffice(config-router)#network 192.168.0.0 0.0.0.255 area 0
HeadOffice(config-router)#network 192.168.1.0 0.0.0.255 area 0
HeadOffice(config-router)#

00:53:17: %OSPF-5-ADJCHG: Process 1, Nbr 192.168.2.1 on FastEthernet1/0 from LOADING to FULL, Loading Done

HeadOffice(config-router)#exit
HeadOffice(config)#exit

%SYS-5-CONFIG_I: Configured from console by console
HeadOffice#show ip route
Codes: C - connected, S - static, I - IGRP, R - RIP, M - mobile, B - BGP
       D - EIGRP, EX - EIGRP external, O - OSPF, IA - OSPF inter area
       N1 - OSPF NSSA external type 1, N2 - OSPF NSSA external type 2
       E1 - OSPF external type 1, E2 - OSPF external type 2, E - EGP
       i - IS-IS, L1 - IS-IS level-1, L2 - IS-IS level-2, ia - IS-IS inter area
       * - candidate default, U - per-user static route, o - ODR
       P - periodic downloaded static route

Gateway of last resort is not set

C    192.168.0.0/24 is directly connected, FastEthernet0/0
C    192.168.1.0/24 is directly connected, FastEthernet1/0
O    192.168.2.0/24 [110/2] via 192.168.1.2, 00:00:18, FastEthernet1/0

HeadOffice#

Saving Our Configuration 

HeadOffice#copy running-config startup-config
Destination filename [startup-config]? [Press Enter Key]
Building configuration...
[OK]
HeadOffice#

Branch Office Router
Router> [Press Enter key]
Router>enable
Router#configure terminal
Enter configuration commands, one per line.  End with CNTL/Z.
Router(config)#hostname branchoffice
branchoffice(config)#interface fastEthernet 1/0
branchoffice(config-if)#ip address 192.168.1.2 255.255.255.0
branchoffice(config-if)#no shutdown

%LINK-5-CHANGED: Interface FastEthernet1/0, changed state to up

%LINEPROTO-5-UPDOWN: Line protocol on Interface FastEthernet1/0, changed state to up

branchoffice(config-if)#exit
branchoffice(config)#interface fastEthernet 0/0
branchoffice(config-if)#ip address 192.168.2.1 255.255.255.0
branchoffice(config-if)#no shutdown

%LINK-5-CHANGED: Interface FastEthernet1/0, changed state to up

Configure routing with ospf

branchoffice(config)#router ospf 1
branchoffice(config-router)#network 192.168.1.0 0.0.0.255 area 0
branchoffice(config-router)#network 192.168.2.0 0.0.0.255 area 0
branchoffice(config-router)#exit
branchoffice(config)#exit
Verity Route:-

Verify all network are now known to router by show ip route command

branchoffice#show ip route
Codes: C - connected, S - static, I - IGRP, R - RIP, M - mobile, B - BGP
       D - EIGRP, EX - EIGRP external, O - OSPF, IA - OSPF inter area
       N1 - OSPF NSSA external type 1, N2 - OSPF NSSA external type 2
       E1 - OSPF external type 1, E2 - OSPF external type 2, E - EGP
       i - IS-IS, L1 - IS-IS level-1, L2 - IS-IS level-2, ia - IS-IS inter area
       * - candidate default, U - per-user static route, o - ODR
       P - periodic downloaded static route

Gateway of last resort is not set

O    192.168.0.0/24 [110/2] via 192.168.1.1, 00:00:33, FastEthernet1/0
C    192.168.1.0/24 is directly connected, FastEthernet1/0
C    192.168.2.0/24 is directly connected, FastEthernet0/0
Check our network are accessible or not by ping command :- 

branchoffice#ping 192.168.0.2

Type escape sequence to abort.
Sending 5, 100-byte ICMP Echos to 192.168.0.2, timeout is 2 seconds:
!!!!!
Success rate is 100 percent (5/5), round-trip min/avg/max = 31/31/32 ms


Configure Router for DHCP Relay agent 
By default Router break brodcast domain and dhcp DORA process run by brodcasting for DHCP Server to get IP address information so we need to told router to send dhcp brodcast to DHCP Server.

branchoffice#configure terminal
Enter configuration commands, one per line.  End with CNTL/Z.
branchoffice(config)#interface fastEthernet 0/0
branchoffice(config-if)#ip helper-address 192.168.0.2
branchoffice(config-if)#exit
branchoffice(config)#exit
branchoffice#

Saving Our Configuration 


branchoffice#copy running-config startup-config
Destination filename [startup-config]? [Press Enter Key]
Building configuration...
[OK]
branchoffice#

Now DHCP server will provide correct ip address by looking at network request coming from for example 192.168.2.0 /24 network. it simple

Thursday, March 10, 2011

Installing , Configuring and Backup/Restore of DHCP Server Role in Windows 2000/2003/2008 Server

Install , Configure , Backup and Restore DHCP Server in windows 2000/2003/2008 Server.

In my last post we has seen basic of DHCP server , today we will see how to install, configure take a backup of DHCP server and how to Restore it from last backup.

Before installing DHCP Server you should Configure your server with static IP Address.


Scope: - A DHCP scope determines which IP addresses are allocated to clients. A scope defines a set of IP addresses and associated configuration information that can be supplied to a DHCP client. A scope must be defined and activated before DHCP clients can use the DHCP server for dynamic TCP/IP configuration. You can configure as many scopes on a DHCP server as needed for your network environment.

exclusion range—one or more IP addresses in the scope that are should not be assign to  DHCP clients.

 
Installing DHCP server on windows 2000/ 2003 Server

  1. Log on as the Administrator
  2. Click Start Run And Type appwiz.cpl it will open  Add /OR Remove program windows.
  3. In Add/Or Remove Program windows Select Add /Remove Windows Component from left side button. It will open Windows component in new window.
  4. In new windows component select networking Services and click Detail at bottom it will open networking services window ,
  5. In networking services windows click mark on Dynamic Host configuration Protocol service (DHCP) and click OK. It will install DHCP server service on your computer when installing it will ask you for Operating system CD (2000 /2003)
  6. After install click ok , ok and close all windows .(Now DHCP server Role is installed on your system)

 
Configuring DHCP server on windows 2000/2003/2008 server.


  1. To configure DHCP server log on as administrator
  2. Click on Start – Administrative tool – DHCP MMC snap-in
  3. In DHCP MMC snap-in select your server
  4. Right Click the server and select New Scope this will open new window for scope name and description  type the scope name and description and click next.
  5. In IP address range window inter the range of ip address that should this dhcp server use to assign the IP between For eg.
  Starting IP Address: 192.168.15.101
Ending IP Address: 192.168.15.254
Subnet Mask: 255.255.255.0
  1. after entering IP range and subnet mask information click Next. It will open new window asking for Configure DHCP Option click yes ,I want to configure these option now and Click Next.
  2. Next Windows ask you to provide Default getaway information , enter you router ip address or default Gateway ip address (it may be your router, firewall or nating server ip address) Click Next (optional)
  3. On Domain name and DNS server window inter you domain name and ip address of  DNS servers. And click next (Optional )
  4. On WINS server window inter the information of your wins server ip address. And click next.
  5. Active Scope windows will appear if you want to activate the scope now click on Yes,I want to activate the scope now else no. and click Next. And last click Finish

Authorizing DHCP in Active Directory Domain.

      (you must Authorize DHCP server to provide TCP/IP information to the client)
  1. To Authorize DHCP server in Active Directory You should be the member of Enterprise Admin group and local Administrator user group.
  2. Open DHCP MMC Snap-in from Start- Administrative Tools- DHCP
  3. In DHCP MMC Snap-in windows select and Right click on server , you want to authorize  and in that select authorize and refresh the DHCP window the icon of your server become green means this server is authorize to provide DHCP Client request.  

Adding the DHCP Server Role on Windows Server 2008
1. log on as the administrator of the local computer.
2. Open The Server Manager from Start – Server Manager , Server Manager windos appear. Expand the Server Manager
window to full-screen if necessary.
3. In the left-hand pane of Server Manager, double-click Roles.
4. Click Add Role. Click Next to bypass Welcome screen.
5. The Select Server Roles screen appears. Place a checkmark next to DHCP Server.
Click Next.
6. The Introduction to DHCP Server screen appears. click Next.
7. The Specify IPv4 DNS Server Settings screen appears. Enter the DNS Server IP Address information for your network configuration and click Next.
8. The Specify IPv4 WINS Server Settings screen appears. Enter WINS server IP Address for your network and click Next.
9. The Add or Edit DHCP Scopes screen appears. Click Add to create a DHCP scope
10. The Add Scope screen appears. Enter the appropriate information for your network
configuration, for example:
Name: Example_Network
Starting IP Address: 192.168.15.101
Ending IP Address: 192.168.15.254
Subnet Mask: 255.255.255.0
Default Gateway: 192.168.1.1
Subnet type: Wired
11. Ensure that there is a checkmark next to Activate this scope, and then click OK. Click Next
12. The Configure DHCPv6 Stateless Mode screen appears. If You want to also use IPv6 then Select Enable Else Select Disable and click Next. If you enable follow the stapes like IPv4 to configure  click Next.
13. The Authorize DHCP Server screen appears. Select authorize this DHCP
server in AD DS and click Next.

 (Note: to authorize is Active Directory user must having enterprise admin group. You must authorize a DHCP server in Active Directory before the server can issue leases to DHCP clients.)

14. The Confirm Installation Selections screen appears. Click Install.

 BACK UP DHCP Server 

1. In the DHCP console, in the console tree, select the appropriate DHCP server.
2. Right-click the server and click Backup.
3. In the Browse For Folder dialog box, select the appropriate folder to back up to,
and then click OK
 
 
OR by command line

netsh dhcp server backup "C:\DHCPbackups.dmp


RESTORE DHCP SERVER 

To restore the DHCP database, right-click the server and click Restore.
1. In the Browse For Folder dialog box, select the folder where the backup resides
and then click OK.
2. In the DHCP dialog box, click Yes to stop and then restart the service.
3. If the status of the service does not update, press F5 to refresh the DHCP console

OR by command line
netsh exec C:\ DHCPbackups.dmp
 

(In next post we will see how to install , Configure, backup and restore on Windows 2008 Core Server)


Wednesday, March 9, 2011

DHCP Server Basic

DHCP Server Basic 

What is DHCP Server?

       The Purpose of DHCP server in Network is to provide the TCP/IP Configuration to the Client. DHCP free up System Administrator from Manually configuring each host on the network. and quickly configure changes in a network configuration. And In The larger network, the greater benefit of using DHCP is that you do not need manually configure and maintain the record  Without dynamic address assignment, each host has to be configured manually and IP addresses must be carefully managed to avoid duplication or miss configuration.

      And Because settings and information are stored centrally, you can quickly and easily add or change a client setting (for example, the IP address of an alternate DNS server) for all clients on your network from a single location. Without a centralized database of configuration information, it is difficult to maintain a current view of the host settings or to change them.

DHCP provides five key benefits to those managing and maintaining a TCP/IP network:-
  1. Centralized administration of IP configuration:- DHCP IP configuration information
    can be stored in one location, enabling the administrator to centrally manage it. A DHCP
    server tracks all leased and reserved IP addresses and lists them in the DHCP console. You
    can use the DHCP console to determine the IP addresses of all DHCP-enabled devices on
    your network.
  2. Dynamic host configuration:- DHCP Server Automatically configure Host and update the changes dynamically.
  3. Seamless IP host configuration: -The use of DHCP ensures that DHCP clients get accurate and timely IP configuration parameters, such as the IP address, subnet mask, default gateway, IP address of the DNS server, and so on, without user intervention. Because the configuration is automatic, troubleshooting of miss configurations, such as mistyped numbers, is largely eliminated.
  4. Scalabilit :- As Scalability is censor  DHCP is Scala for both small and very large network.
  5. Flexibility :- Using DHCP gives the administrator increased flexibility, allowing the
    administrator to more easily change IP configurations when the infrastructure changes.
It provide following information to client but not limited to it. It Provide more than 70 TCP/IP configuration settings.
  • IP Address.
  • Subnet Mask
  • Default Gateway
  • DNS Domain Name
  • Address of DNS Server
  • Address of WINS Server.
  • And many more
How it Work ? OR DHCP Client And Server in DORA Process

      When you turn on DHCP on Client Computer to get TCP/IP information from DHCP Server. there are some communication will get between DHCP Client and DHCP Server. this process are called as DHCP DORA Process. DORA Means Discover, Offer, Request and acknowledgment .


  1. Discover: -When you turn on DHCP on client computer to get TCP/IP information from DHCP server. because client do not having IP address information about DHCP server to get TCP/IP information .It send broadcasts packet in a network to find DHCP server who can give him TCP/IP information.
  2. Offer: - If in network there are DHCP server running . All  DHCP server Responds to the broadcast by sending Offer Packet because Client do not having IP Address it also broadcasts back to client by offering TCP/IP configuration. (DHCP server ask Client for confirmation that it is ready to accept the offer else that IP address will be provided to other clients.)
  3. Request : - So Client computer responds with first DHCP offer by sending  Request Packet. for acceptance and because other Server not got any confirmation by client it know that client has not accecpted our offer so we can be able to give ipaddress to other client.DHCP Request packet are  uni cast packet because now client know IP address of DHCP server to contact. 
  4. Acknowledgment :- After receiving  the request packet DHCP Server send Acknowledgment packet to client that it can use this IP address .

(In next post we will see how to install, Configure and backup DHCP server in windows 2003 and 2008 server)


    Wednesday, February 9, 2011

    Taking Backup and Restore your Network Configuration by command line


    Taking Backup and Restore  your Network Configuration by command line.

    Hi Friends,
         As I promise, I will show you how to configure your (LAN) Network using GUI and from Command line. today , I will show you how to configure your LAN from GUI and from Command line. and I also show you how to take your network configuration backup and restore quickly.

    To allow your system (Computer ) to communicate to other network system it required following basic information TCP/IP network
    That is:-

    Required :
    1)IP Address  (Logical Number to system to identify  it should be unique )
    2) Subnet mask (To find out the Network information )

    Optional :
    3) Default Gateway (Exit point or interpriter how know how to reach to other network Basically it is the ip address of your Router (A Device that handle layer 3 information and know how to route the packet ) )
    4) DNS Server : IP address of your DNS server that resole your human known host name to the ip address. It is required for naming resolution.
    5) WINS Server: same as DNS use in Window network.


    Network Configuration Using GUI

        The Most easiest method for configuring your network is GUI.

    1) To configure you network interface open  network connection window by Right Clicking on "My Network Places" from your Desktop then select Property

    OR
    By Start ----Run---(Type ) ncpa.cpl and click ok . It will open Network connection Windows there you find all interface on you system.look like:


    2) Now Right Click On You "Local Area Connection" interface or any you want to configure and select property . It look like this:
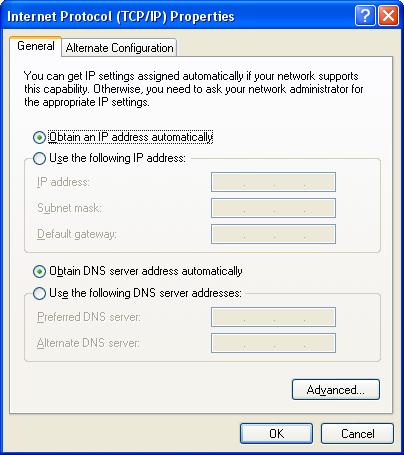
    3) In "Local Area Connection " Property windows Select Internet Protocol (TCP/IP) and Click On properties button. It will open new window Internet protocol TCP/IP property windows
    4) If you want to allow DHCP server to Configure you network select option obtain IP address automatically and if you want configure you network manually Select use following IP address. and there type the IP Configuration that you given by your Network Administrator or By your ISP (Internet Service Provider )  for example I am configuring my network with following 

    5) Click OK to apply it . then Click OK to Close Local Area Connection Property windows .and close your Network connection windows. that's it so ease.

    Network Configuration Using Command line:

        This method is little difficult but very interesting for quickly change your network configuration.

    Suppose I want to configure same setting using command line the command name is netsh

    If I you want to configure your Local Area Connection with DHCP 

    1) Open the command prompt by typing CMD in Start- ---Run ---(Type "cmd") and then Click OK.
        It will open Dos command prompt .
    2) Now in Command prompt type the following Command to configure your Local Area Connection interface to use DHCP:

    netsh interface ip set address "Local Area Connection" dhcp


    In Above command "Local Area Connection " is the name of the interface card you want to configure as DHCP

    that's it. It will configure your Local Area Connection to obtain IP automatically .

    If I you want to configure your Local Area Connection manually with same ip setting I use in GUI Configuration.in Single line:

    netsh interface ip set address "Local Area Connection" static 192.168.19.2 255.255.255.0 192.168.19.1 1

    In Above command 
     "Local Area Connection " is the name of your interface card that you want to confiure
    "192.168.19.2" the IP address you want to assign to interface card
    "255.255.255.0" is the Subnet mask for given interface card.
    "192.168.19.1" is the Default Gateway for interface card (If you not want to assign Default Gateway simply use 0.0.0.0 )
    "1" for matrix.
    it will configure your system Local Area Connection with use following IP address option. and add  IP address information like IP address, Subnet mask and Default Gateway.

    Now we add DNS infomation to our Local Area Connection interface by using following command

    To Configure Primary DNS server use the command
    netsh interface ip add dns "Local Area Connection" 202.54.10.4

    To Configure Secondary DNS Server Use the following command:

    netsh interface ip add dns "Local Area Connection" 202.205.5.5 index=2

    It will Add your DNS server inforamtion on your Local Area Connection Interface.

    Backup your Network Configuration:

    To Backup your All Network Interface Configuration to the txt file as office_LAN.txt on C drive Use the following commad:

    netsh -c interface dump > c:/office_LAN.txt

    It will take your network connection backup to c drive as office_LAN.txt

    Restore Your Network Configuration from your backup you have taken:
    netsh -f c:/office_LAN.txt

    It will restore your network connection Configuration as same as the time you have taken backup.