To install Active Directory on Windows Server 2012 we will
need Static IP to system, DNS & FQDN for Domain.
Adding
the Active Directory Domain Services Role
Log on to server with local administrator account & open
Server Manager.
From the Server Manager window
click on “Add roles and features”.
Then “Before you begin screen”
will open, click Next.

Select “Role-based or
feature-based installation” in the “Installation Type” screen below & click
Next.

You will then see below screen from which you
can select a destination server. Windows server 2012 is having this new feature
using which you can deploy roles and features to remote servers or to an
offline virtual hard disk. We are selecting the current server from the
server pool. Select the server & click Next.

Then on Add Roles And Features Wizard select
the “Active Directory Domain Services” and “DNS Server”

Then you will be prompted to add the features needed by
Active Directory Domain Services (ADDS). Click “Add Features”.

Then on below screen select “DNS Server” & click Next.

Then on below screen you can select additional feature if
you want & click Next.
(Group Policy Management feature will be automatically
installed during the domain promotion).

Then on “Active Directory Domain Services” page below you
will see some basic information about ADDS & DNS. Click Next.

Then on next page you will be able to see summary of the
roles & features selected for installation. Click Install.

It will start installation process & upon completion
will show installation succeeded message. Click Close.

Promoting Server To A
Domain Controller
After installing AD DS roles & features you will be able
to see AD DS in the left pane in Server Manager window with warning message
stating “Configuration required for Active Directory Domain Services” Click on More.

Then All Server Task Details And Notifications window will
open. Click on “Promote this server to a domain controller” under Action.

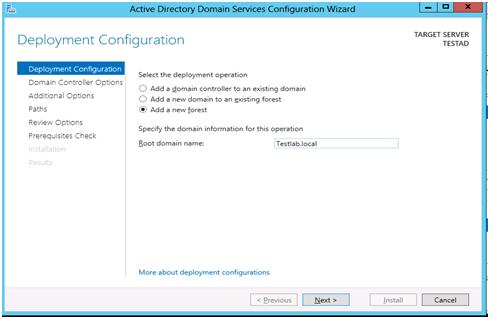
Then AD DS configuration wizard will open.
Select “Add a new forest” as this is the first
domain controller. Enter Root domain
name & click Next.
On below screen specify Forest Functional Level & Domain
Functional Level also provide Directory Services Restore Mode password. Click
Next.

You will get warning regarding DNS delegation, which can be
ignored. Click OK & then Next.

On next window, NetBIOS name will be automatically assigned.
Click Next.

On next window you will be able to confirm or change the
path of Database, Logs & SYSVOL folders. Click Next.

Then on Review Options page, review your selections &
click Next.

Then it setup will check for prerequisite. After passing
through prerequisite, click on Install.

At completion of setup, system will restart. After promoting
the server to domain, your local administrator becomes domain administrator. So,
login to the server using domain administrator user name and password.